Friday 24 August 2018

Intelligent motion detection camera

So what Have I been doing with all this object detection? Simple, setting up a security camera!

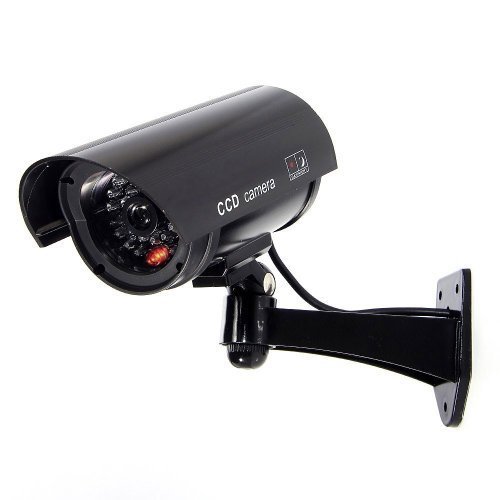
It's quite simple, I started an age ago with building a camera from a pi-zero with a pi-cam (with the ir filter removed). Just find a dummy housing, like this one:

The install motion-eye (The instructions there are awesome) and you've got a security camera!

Next, wouldn't it be nice to alert you when it found something.. So I tried setting up motion-eye to trigger when it thought it saw something, but it was always giving me lots of false positives, for example when a cloud went overhead, a lot of pixels would change, then it would alert me.

Hmm not ideal, I wasn't that keen on having a cloud alerting function.

That's why I wrote the web service that you can find here on GitHub. So I set it up to email me when it detects. Even with that, I still got a lot of false object detections, so I modified the web service to have a filter and only filter if it spots one of the defined labels (- car     - person     - bicycle     - motorcycle     - cat     - dog)

How?
Well setup motion-pi like so:


download the source code from git
git clone https://github.com/stevegal/objectdetect_ws.git
cd objectdetect_ws

modify the application properties for your setup (in src/main/rescources) and build it and run it
mvn clean package
java -jar target/objectdetect4j-0.1-SNAPSHOT.jar

and now the detect script should look like:
#!/bin/bash

cd 
WORKING_DIR=$(ls -t | head -1)

cd $WORKING_DIR

for filename in *.jpg
do
 curl -m 5 -F "image=@$filename" http://:/detect/mailTo?mailTo=
 rm -f $filename
done

You now should have a security camera that sends you an email if it spots any of the objected you setup in the spring properties file. The email should look like this


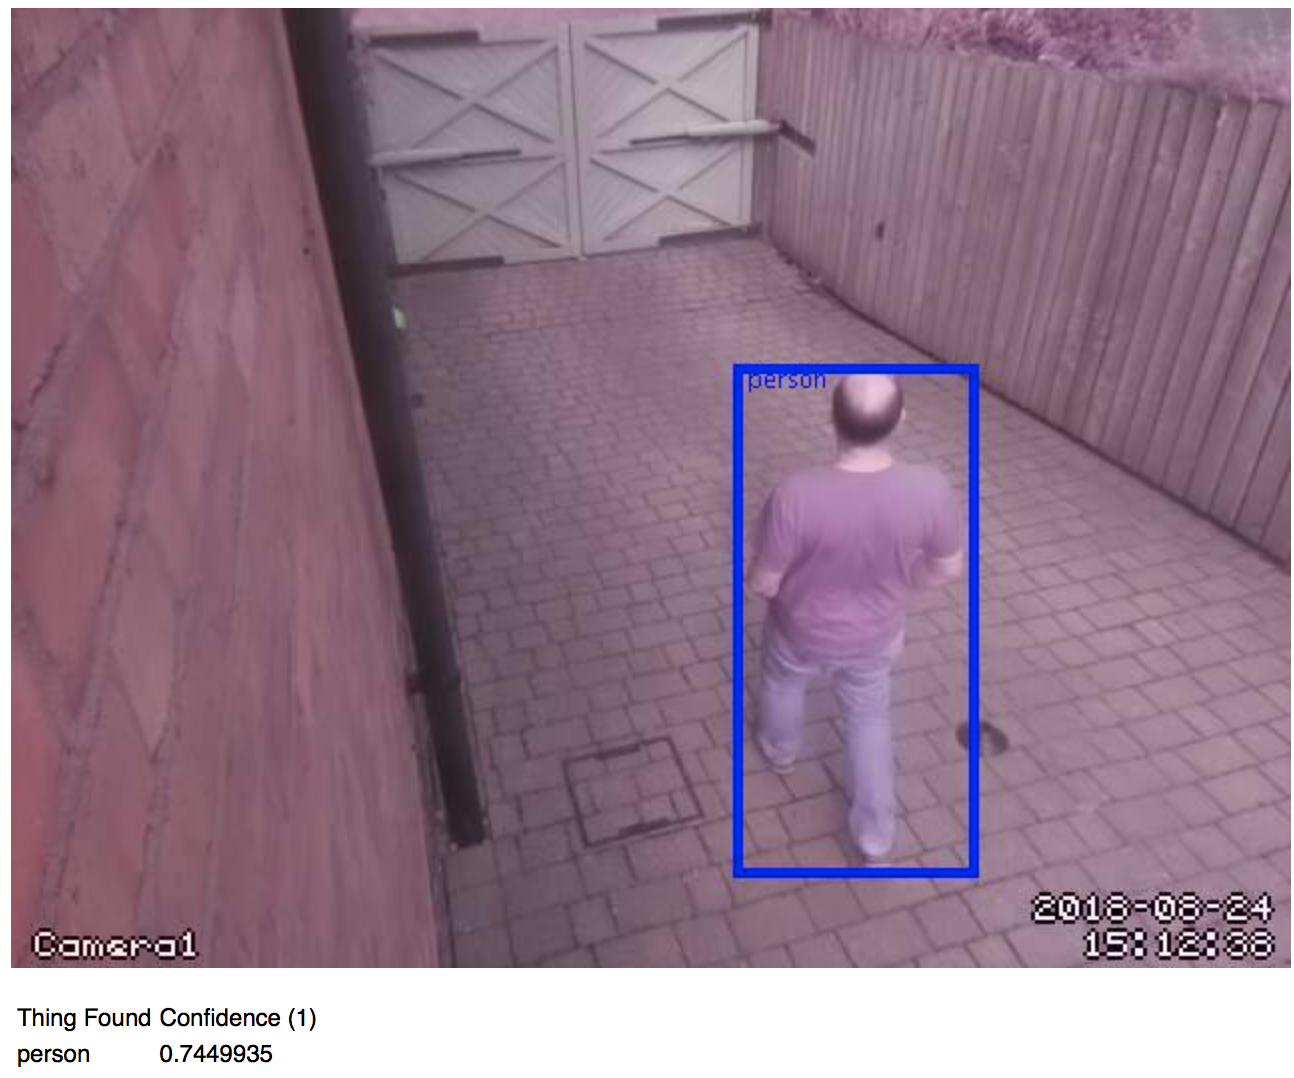
with a nice box around the things it has spotted. Works for me!

Thursday 23 August 2018

Tensorflow - The importance of session

Java Tensorflow


I've created a little web server that loads in a frozen graph and processes the images that are sent to it. It can be found here.

When I first set it up I was really disappointed at the performance, performance on the mobile phones were better than I was getting... 

My code was straight out of the example pages, e.g.
    try (Session session = new Session(this.graph)) {
      outputs = session
          .runner()
          .feed("image_tensor",tensor)
          .fetch("detection_scores")
          .fetch("detection_classes")
          .fetch("detection_boxes")
          .run();
    }

It was taking an age e.g. At first I thought it was down to the library not being compiled for my cpu as it was warning me on startup... so I recompiled (using the awesome documentation { basically
bazel build --config opt //tensorflow/java:tensorflow //tensorflow/java:libtensorflow_jni
} ), but it was still roughly the same. Not that then. But how bad was it?

2018-08-23 19:01:31.971  INFO 34476 --- [nio-9000-exec-8] u.c.s.t.c.TensorflowImageEvaluator       : session  time:0
2018-08-23 19:01:31.972  INFO 34476 --- [nio-9000-exec-8] u.c.s.t.c.TensorflowImageEvaluator       : runner setup  time:1
2018-08-23 19:01:36.050  INFO 34476 --- [nio-9000-exec-8] u.c.s.t.c.TensorflowImageEvaluator       : run time:4078
2018-08-23 19:01:36.051  INFO 34476 --- [nio-9000-exec-8] u.c.s.t.c.TensorflowImageEvaluator       : results time:0

That's right nearly 5 seconds... I though this was supposed to be quick... so what was I doing wrong? Basically not reusing the session. Once that is being reused... just look what happens on the same image. In this one I'm using a set of pre-pared sessions in a BlockingQueue to get the single thread use requirements for session
      Session session = this.sessions.take();
      Session.Runner runner = session
          .runner()
          .feed("image_tensor", tensor)
          .fetch("detection_scores")
          .fetch("detection_classes")
          .fetch("detection_boxes");
      start = logTimeDiff("runner setup  time:" ,start);
      outputs = runner.run();
      start = logTimeDiff("run time:" , start);
Just remember to pop the session back in at the end!

2018-08-23 19:01:57.739  INFO 34476 --- [io-9000-exec-10] u.c.s.t.c.TensorflowImageEvaluator       : session  time:0
2018-08-23 19:01:57.739  INFO 34476 --- [io-9000-exec-10] u.c.s.t.c.TensorflowImageEvaluator       : runner setup  time:0
2018-08-23 19:01:57.791  INFO 34476 --- [io-9000-exec-10] u.c.s.t.c.TensorflowImageEvaluator       : run time:51
2018-08-23 19:01:57.791  INFO 34476 --- [io-9000-exec-10] u.c.s.t.c.TensorflowImageEvaluator       : results time:0

Turns out it *is* fast after all!

My guess is its loading in the graph on first run so saving that... boom! fast runs!

Saturday 18 August 2018

Setting up TensorFlow Object Detection on Mac OSX

This is more notes for me rather than anything considered.

Basically follow:
https://www.tensorflow.org/install/install_mac

but there are some caveats that I needed to do in order to get it working.

Basically `protoc` wasn't setup... how to install?


wget https://github.com/google/protobuf/releases/download/v3.6.1/protoc-3.6.1-osx-x86_64.zip
unzip protoc-3.6.1-osx-x86_64.zip
cp bin/protoc /usr/local/bin/protoc
Have a look at the readme:
Ensure you pip install the lot
pip install --user Cython
    pip install --user contextlib2
    pip install --user pillow
    pip install --user lxml
    pip install --user jupyter
    pip install --user matplotlib
Now download the object detection model
git clone https://github.com/tensorflow/models.git
cd models/research
protoc object_detection/protos/*.proto --pyhton_out=.
export PYTHONPATH=$PYTHONPATH:`pwd`:`pwd`/slim
cd object_detection
jupyter notebook
Now you should be ready to follow the notebook instructions. Super fast and super easy

Monday 24 October 2016

Apache config with mod_auth_openidc & openam

Okay, so we compiled mod_auth_openidc recently and now it's time to configure Apache so we can interact with an OAuth2 server.

We'll do this with OpenAM - it's free and fun(ish) to configure & customise in a kinda weird way. I'll blog separately on a simple configuration for OpenAM.

Stay with the series, because we'll get to an Alexa skill in due course!

First up a confession.. brew install of apache. Although the compile worked fine, I couldn't get that version of apache to work with certificates from letsencrypt.. so I basically followed the same things in that post but for the apache version from macports instead. Note that macports is a bit more "general" with it's install locations, but it all basically follows the exact same pattern as I laid out in the previous post. If you want me to spell this out in detail, then comment below and I'll sort something out.

<IfModule auth_openidc_module>
  OIDCProviderIssuer https://external.server.location:443/openam/oauth2
  OIDCProviderAuthorizationEndpoint https://external.server.location/openam/oauth2/authorize
  OIDCProviderTokenEndpoint https://external.server.location/openam/oauth2/access_token
  OIDCProviderTokenEndpointAuth client_secret_post
  OIDCProviderUserInfoEndpoint https://external.server.location/openam/oauth2/userinfo
  OIDCSSLValidateServer Off
  OIDCClientID <MOD_CLIENT_ID>
  OIDCClientSecret <MOD_CLIENT_PASSWORD>
  OIDCScope "openid email"
  OIDCRedirectURI https://external.server.location/protect/redirect_uri
  OIDCProviderJwksUri https://external.server.location/openam/oauth2/connect/jwk_uri
  OIDCCryptoPassphrase <CRYPTO_PASSWORD>
  OIDCOAuthSSLValidateServer Off
  OIDCOAuthRemoteUserClaim user_id
  OIDCOAuthIntrospectionEndpoint https://external.server.location/openam/oauth2/introspect
  OIDCOAuthIntrospectionTokenParamName token
  OIDCOAuthClientID <OAUTH_CLIENT_ID>
  OIDCOAuthClientSecret <OAUTH_CLIENT_PASSWORD>
</IfModule>

so what does all this do? you'll notice 2 sections, one lot to do with OIDC and the other all prefixed with OIDCOAuth.

Well, I mentioned we're going for Alexa skill at the end of all this right? In this mode I need mod_auth_openidc to act as a OAuth2 Resource Provider aligned with the Alexa skill (more on this in the later post), and the second mode is mod_auth_openidc as an OpenIdConnect Resource Provider. I use this second mode to protect the resources for my web server.

 For OpenAM I use JwksUri so that the token I give out from OpenAM can be validated by mod_auth_openidc. To do this is has to know the uri endpoiint it can hit (OIDCProviderJwksUri).

The OIDCRedirectURI is a endpoint that mod_auth_openidc can be in full control of so do not think of putting a real resource in this location (but you'll need to protect it nonetheless!).

I use this to protect it

<Location /protect/>
    Authtype openid-connect
    require valid-user
</Location>

The redirect_uri bit is important to, so leave it in.

The OIDCProviderUserInfoEndpoint provides the openid connect user auth point and the OIDCProviderTokenEndpointAuth tells the method we're using (client secret post). The issuer needs to match your openam configuration - it is validted by mod_auth_openidc so check it and get it right! (I got this worng lots of times and it had me tearing what little hair remains out until I sussed out what this meant). The OIDCClientID and password are the client id and password for the web server bit of my world.

the other bit you might need is how to protect your locations for this web server mode. I use things like

<Location /your_root_here/>
    Authtype openid-connect
    require valid-user
</Location>

As you can see, basically the same as the fake resource that is protected by mod_auth_openidc redirect stuff the second bit id for resources that Alexa hits. (OIDCOAuth stuff!). I'll go into that later!

Well, that's it for tonight... more on Alexa to follow...

Tuesday 4 October 2016

Securing Apache on OSX using mod_auth_openidc

mod_auth_openidc on OSX

I recently bought an Alexa, and thought it would be nice to hook that into my home automation mini projects.

The first thing I need to do therefore was to get serious on Authorization and Authentication. It's for my home, so I'm happy enough to terminate SSL at the Apache boundary and then allow everything in the DMZ to just play together. The basic was to just tweak my Apache to do the authorization and loop back to the authenticator if not authorized.

I came across this project mod_auth_openidc which looked like just what the doctor ordered. Well, not quite as it turns out.

You see I'm on OSX, and there was no distribution available. No matter, I'm a developer right, so I'll just build it!

Build it


git clone https://github.com/pingidentity/mod_auth_openidc.git

Let's just check the INSTALL

You will require development headers and tools for the following
dependencies:
 Apache (>=2.0)
 cjose (>=0.4.1)
 OpenSSL (>=0.9.8) (>=1.0.1 for Elliptic Curve support)
 Curl (>=?)
 Jansson (>=2.0) (JSON parser for C)
 pcre3 (>=?) (Regular Expressions support)
 pkg-config

Install pre-requistes

Okay, so I've got a little bit more stuff to do before configure time... not problem lets get it started

brew install curl
brew install openssl
brew install jansson
brew install pcre

I'd better get the apache stuff as well

brew install apr-util
brew install apr
brew tap homebrew/apache
brew install httpd24


Oh yeah... this is a mac so I'd better tweak my xcode links...(see here)
sw_vers -productVersion | grep -E '^10\.([89]|10)' >/dev/null && bash -c "[ -d /Applications/Xcode.app/Contents/Developer/Toolchains/XcodeDefault.xctoolchain ] && sudo -u $(ls -ld /Applications/Xcode.app/Contents/Developer/Toolchains/XcodeDefault.xctoolchain | awk '{print $3}') bash -c 'ln -vs XcodeDefault.xctoolchain /Applications/Xcode.app/Contents/Developer/Toolchains/OSX$(sw_vers -productVersion).xctoolchain' || sudo bash -c 'mkdir -vp /Applications/Xcode.app/Contents/Developer/Toolchains/OSX$(sw_vers -productVersion).xctoolchain/usr && for i in bin include lib libexec share; do ln -s /usr/${i} /Applications/Xcode.app/Contents/Developer/Toolchains/OSX$(sw_vers -productVersion).xctoolchain/usr/${i}; done'"

Note the httpd version - this is important - I built with httpd22 initially - don't do that!  It sounds like my initial thoughts on this were wrong! 2.2 should work fine (not checked, but I've been reliably informed it all works - I thought I had unknown symbols on 2.2, but I may have had other problems and came to the wrong conclusion)
and now for that cjose thing...

brew install cjose

ah. not present....

Oh well, I'm a developer, I'll build it...

Build pre-requisites


git clone https://github.com/cisco/cjose.git
cd cjose

now on to building it..

./configure CFLAGS="-I/usr/local/include" --with-openssl=/usr/local/opt/openssl --with-jansson=/usr/local/opt/jansson --prefix /usr/local/opt/cjose
make
make install

Note this install cjose into /usr/local/opt/cjose (that's the prefix part in configure! important!) - this is important, you'll need this for the mod_auth_openidc build!

Build mod_auth_openidc

change into your mod_auth_openidc directory,

brew install curl
export  CURL_CFLAGS=-I/usr/local/opt/curl/include
export CURL_LIBS=-L/usr/local/opt/curl/lib
./configure --with-apxs2=/usr/sbin/apxs

at this point, after doing a make and installing it to the httpd24 libexec and adding it in my config, it all went a bit wrong. Symbols and things not found. No matter, I'm a developer, right... I can do this... well... after getting some help from pings' mod_auth_openidc google group, I settled on this.

Edit the Makefile

change the CFLAGS and LIBS to...

CFLAGS=-I/usr/local/opt/openssl/include -L/usr/local/opt/openssl/lib -I/usr/local/opt/curl/include -I/usr/local/Cellar/jansson/2.7/include  -I/usr/local/opt/cjose/include -I/usr/local/Cellar/pcre/8.39/include  $(REDIS_CFLAGS)
LIBS=-lssl -lcrypto -lz  -L/usr/local/opt/curl/lib -lcurl -L/usr/local/Cellar/jansson/2.7/lib -ljansson  -L/usr/local/opt/cjose/lib -lcjose -L/usr/local/Cellar/pcre/8.39/lib -lpcre  $(REDIS_LIBS)

change the install directory to...
.PHONY: install
install: src/mod_auth_openidc.la
        /usr/sbin/apxs  -i -S LIBEXECDIR=/usr/local/Cellar/httpd24/2.4.23_2/libexec -n mod_auth_openidc src/mod_auth_openidc.la

now finish the build

make clean
make
make install
and we'd better check all those dependencies and things...
$ otool -L /usr/local/Cellar/httpd24/2.4.23_2/libexec/mod_auth_openidc.so 
/usr/local/Cellar/httpd24/2.4.23_2/libexec/mod_auth_openidc.so:
 /usr/local/opt/openssl/lib/libssl.1.0.0.dylib (compatibility version 1.0.0, current version 1.0.0)
 /usr/lib/libz.1.dylib (compatibility version 1.0.0, current version 1.2.8)
 /usr/local/opt/curl/lib/libcurl.4.dylib (compatibility version 9.0.0, current version 9.0.0)
 /usr/local/opt/cjose/lib/libcjose.0.dylib (compatibility version 1.0.0, current version 1.0.0)
 /usr/lib/libSystem.B.dylib (compatibility version 1.0.0, current version 1238.0.0)
 /usr/local/opt/jansson/lib/libjansson.4.dylib (compatibility version 12.0.0, current version 12.0.0)
 /usr/local/opt/openssl/lib/libcrypto.1.0.0.dylib (compatibility version 1.0.0, current version 1.0.0)
 /usr/local/opt/pcre/lib/libpcre.1.dylib (compatibility version 4.0.0, current version 4.7.0)
If you see that then I think you are good to go! now edit the httpd.conf... but we'll do that in a later blog

Friday 20 April 2012

Spring security - @PreAuthorize("hasPermission()")

the role checking is cool in spring security, by annotating we can restrict access to method calls in the controller or service tiers (or both). I'll leave it up to you to decide where (but if you need to restrict access to resources, then restrict it at the resource level!)

there is a way to hook into the "hasPermission" expression language and do really cool stuff see spring security by example for a good example. but this is only available if we compile with debug. Surely we can enhance things so we don't need this debug map around...

It turns out there is!

But how?.... let me explain....

I'm aiming for something like (to use the example form the linked blog)
@PreAuthorize("hasPermission(#myParam,'isDirector')")
        public void exampleSecuredMethod( @SpelParameter("myParam") long parameter )
        {
            ...some code in here to do something secure
        }

First we need a new annotation that is retained at runtime

@Retention(RetentionPolicy.RUNTIME)
@Target(ElementType.PARAMETER)
@Documented
public @interface SpelParameter {

    String value() default "";
}

then we need a new ParameterNameDiscoverer
public class SpelParameterMethodNameDiscoverer implements ParameterNameDiscoverer
{
     public String[] getParameterNames( Method method )
     {
        List< String > foundParameters = new ArrayList< String >();
        Annotation[][] parameterAnnotationArrays = method.getParameterAnnotations();
        for( Annotation[] parameterAnnotations : parameterAnnotationArrays )
        {
            for( Annotation parameterAnnotation : parameterAnnotations )
            {
                if( parameterAnnotation instanceof SpelParameter )
                {
                    foundParameters.add( ( (SpelParameter)parameterAnnotation ).value() );
                }
            }
        }
        return foundParameters.isEmpty() ? null : foundParameters.toArray( new String[ foundParameters.size() ] );
     }

    /**
     * currently we don't support permissioning on contructors
     */
    public String[] getParameterNames( Constructor arg0 )
    {
        return null;
    }
}

and finally an evaluation context which will look very much like the org.springframework.security.access.expression.method.MethodSecurityEvaluationContext
public class SpelParameterMethodSecurityEvaluationContext extends StandardEvaluationContext
{
    private ParameterNameDiscoverer parameterNameDiscoverer;
    private boolean                 argumentsAdded;
    private MethodInvocation        mi;

    public SpelParameterMethodSecurityEvaluationContext( Authentication user, MethodInvocation mi )
    {
        this( user, mi, new LocalVariableTableParameterNameDiscoverer() );
    }

    public SpelParameterMethodSecurityEvaluationContext( Authentication user, MethodInvocation mi, ParameterNameDiscoverer parameterNameDiscoverer )
    {
        this.mi = mi;
        this.parameterNameDiscoverer = parameterNameDiscoverer;
    }

    @Override
    public Object lookupVariable( String name )
    {
        Object variable = super.lookupVariable( name );
        if( variable != null )
        {
            return variable;
        }

        if( !argumentsAdded )
        {
            addArgumentsAsVariables();
            argumentsAdded = true;
        }

        return super.lookupVariable( name );
    }

    public void setParameterNameDiscoverer( ParameterNameDiscoverer parameterNameDiscoverer )
    {
        this.parameterNameDiscoverer = parameterNameDiscoverer;
    }

    private void addArgumentsAsVariables()
    {
        Object[] args = mi.getArguments();
        Object targetObject = mi.getThis();
        Method method = ClassUtils.getMostSpecificMethod( mi.getMethod(), targetObject.getClass() );

        List< String > paramNames = Arrays.asList( parameterNameDiscoverer.getParameterNames( method ) );

        // this might be slow as we are looping over each parameter... if so
        // cache locations and parameter names
        Annotation[][] parameterArrayAnnotations = mi.getMethod().getParameterAnnotations();
        for( int parameterIndex = 0; parameterIndex < parameterArrayAnnotations.length; parameterIndex++ )
        {
            Annotation[] annotationsOnParameter = parameterArrayAnnotations[ parameterIndex ];
            for( final Annotation annotation : annotationsOnParameter )
            {
                if( annotation instanceof SpelParameter && paramNames.contains( ( (SpelParameter)annotation ).value() ) )
                {
                    this.setVariable( ( (SpelParameter)annotation ).value(), args[ parameterIndex ] );
                }
            }
        }

    }

}
now finally the spring config for the security expression language evaluator


you'll detect that this xml is aimed at my test class, and not production stuff, but its the same thing.

And so we can do the things that JAKUB NABRDALIK suggested in his blog, but now with the parameters availble at runtime WITHOUT the debug information around.

How cool is that?

Tuesday 13 December 2011

Spring and the transaction annotation (part1)

Okay, I know this is documented in the spring documentation, but it's easy to forget and it can really trip you up, but if you are calling from within a class to another method on the same class that is marked as transactional you won't get the transaction you are expecting.

But how are you supposed to catch these bugs in test code? Easy mock comes to the rescue again....

Let me explain

Spring has made it really easy to test your code. It ships with a full test harness and enables you to override the classpath with certain resources when running certain testcases. So how does this help?
Well, mock out the jpa layer! That way you can see AND TEST when a transaction starts and when it ends.


so that basically says to Spring "hey, if you want to use that entity manager bean, you know, the one that implements javax.persistence.EntityManagerFactory, then use EasyMock's factory method called 'createStrickMock'."

so how does this work in code then?

I'll get to that in part 2!